A site assessment checklist helps EHS and facility teams see where people work at height and what they face there. A good fall protection programme starts with that picture. This checklist guides your first walk-through, helps you record what you find, and prepares you for a professional site assessment.
Written by: Yatin Chaudhary, TsaF. Last updated: 15 October 2026.
Site assessment checklist: key takeaways
- Walk the site with the people who actually use it, not just with drawings.
- Check six areas: access points, edges and openings, skylights, routes, vehicle tops and existing systems.
- Record every finding with a location, a photo and a note on how often people go there.
- Rank findings by frequency of access and severity, then separate quick wins from engineered solutions.
Before you use the site assessment checklist
Good preparation makes the walk-through faster and more accurate. First, gather roof drawings, previous inspection records and a list of rooftop plant such as HVAC units, fans and solar arrays. Next, collect any existing fall protection documents, including installation certificates and inspection reports.
Then talk to the people who go up. Maintenance staff, contractors and cleaning teams often use routes that do not appear on any drawing. For example, a technician may cross a skylight zone because it is the shortest path to a fan. Ask them where they go, how often, and what they carry.
Finally, plan the walk itself. Choose a dry day, take a camera and a measuring tape, and make sure someone competent accompanies you. Never step onto an unprotected roof area just to complete the checklist.
Access points
Start where people get onto the roof or structure. Then look at every ladder, hatch and stair. Also check the condition of the access and, above all, what protects people at the top, where they step off.
- Is the ladder secure, with sound rungs, stringers and brackets?
- Is there a cage, a vertical lifeline, or nothing?
- Is there a gate or barrier at the top exit?
- Does the hatch open next to an unprotected edge?
Our page on roof access point hazards explains the common failures.
Edges, openings and skylights
Next, walk the perimeter and note every place where someone could fall. In particular, measure parapet heights, because a low parapet may not stop a fall. Also record floor openings, roof voids and gaps around plant.
Fragile roof lights deserve special attention. Polycarbonate and fibre sheets weaken with age, and dust can hide them. Therefore, mark every skylight on your drawing, even ones that look solid. For background, see unprotected roof edges and fragile skylights.
Where people often work near an edge, collective protection is usually the best answer. A rooftop barricade system protects everyone without any action from the user.
Routes and obstructions
Now follow the routes people take between access points and plant. Note pipes, ducts, ridge lines and level changes that people must step over. As a result, each of these becomes a trip point. In addition, check the surface. Wet sheeting, moss and loose gravel all raise the risk of a slip.
If people cross the same obstruction often, a walkway or step-over may remove the hazard entirely. So record how often each route is used.
Vehicle tops and loading bays
Many sites forget that work at height also happens at ground level. Drivers and loaders climb onto tankers, trucks and wagons to open hatches or secure loads. So record each task, the vehicle heights involved, and any existing gantries or anchors. Our page on vehicle tops and loading bays covers the hazard in detail.
Existing systems and records
Next, list every installed lifeline, barricade and anchor. For each one, first check the label, the date of the last inspection and any visible damage. A system without a current inspection should not be relied on until a competent person checks it.
Also review the people side. Check PPE stock, harness inspection records, training records and rescue plans. A fall arrest system without a rescue plan is incomplete.
Prioritising findings from your site assessment checklist
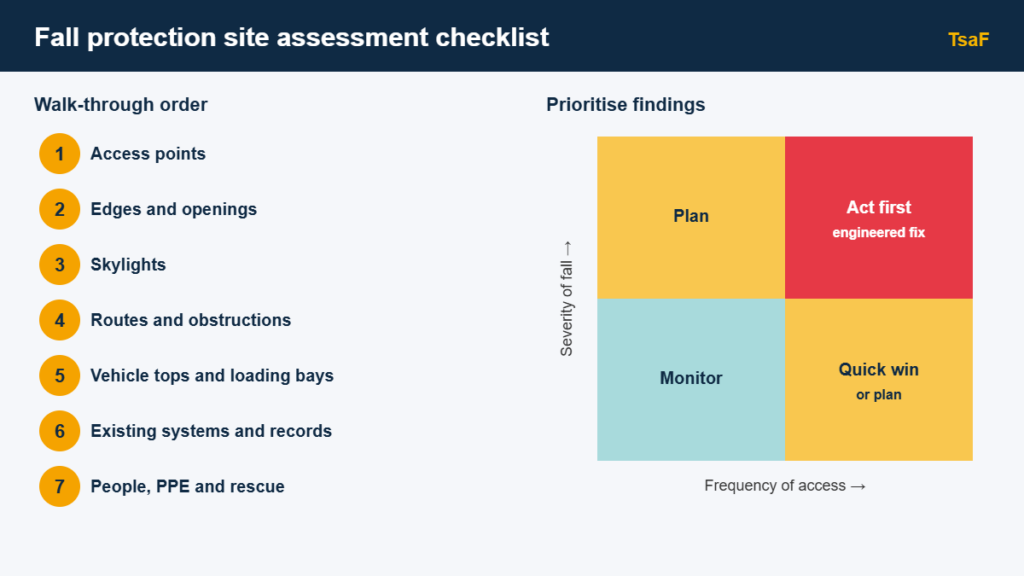
Once the walk-through is complete, rank each finding. In most cases, a simple method works well. Score how often people are exposed, then score how severe a fall would be. After that, findings that score high on both come first.
Then split the list into two groups. Quick wins include closing off unused areas, fixing signage or repairing a damaged gate. Engineered solutions include lifelines, barricades and skylight protection, which need design and installation.
Sample site assessment checklist table
| Area | What to check | Record |
|---|---|---|
| Access points | Ladder condition, cage or lifeline, top exit gate | Photo, height, frequency of use |
| Edges and openings | Parapet height, voids, gaps around plant | Location, length of edge |
| Skylights | Material, condition, existing guards | Count, size, distance to routes |
| Routes | Obstructions, level changes, surface | Route sketch, trip points |
| Vehicle tops | Tasks, vehicle heights, anchors | Bay number, users per shift |
| Existing systems | Labels, inspection dates, damage | System type, last inspection |
| People and rescue | PPE, training, rescue plan | Gaps and owners |
Sources and further reading
- HSE (UK): Work at height guidance.
- OSHA (US): Fall protection.
- When should fall protection systems be inspected?
Frequently asked questions
It should cover access points, edges and openings, fragile skylights, routes and obstructions, vehicle tops and loading bays, existing systems and their records, and the people side: PPE, training and rescue plans.
An EHS or facility lead, accompanied by maintenance staff or contractors who actually use the roof. A competent person should be present, and nobody should step onto unprotected areas to complete the checklist.
Score each finding for how often people are exposed and how severe a fall would be. Deal first with findings that score high on both, then separate quick wins from engineered solutions.
Repeat it after any change to the roof, plant, routes or work tasks, and review it at least once a year alongside the annual inspection of installed systems.
A checklist identifies and ranks risks. A professional survey adds structural checks, design calculations and a documented recommendation, which you need before installing engineered systems.
Next step after your site assessment checklist
A first walk-through shows you where the risks are. A professional survey then turns them into a costed, engineered plan. Request a site assessment and a TsaF engineer will review your roof, access points and tasks at height.